WORDPRESS WEBSITE: STEP BY STEP GUIDE TO BUILDING YOUR WEBSITE
Table of Contents
WordPress website is now essential as more and more businesses move online. One of the services that will continue to rise in demand is website design/development. Every business needs a website no matter the size and learning how to build a website can save small business owners lots of money and also put money in the pocket of anyone who decides to master this important skill.
Are you interested in learning how to build a website, either for your business or to help other businesses for a fee? The mere thought of creating a website can be terrifying especially if you are not techy.
If that is you, don’t bother, we‘ve got you covered. By the time you are through with this article you would have been better informed and equipped to go out there and create your website and the best part is that there is No Coding, No Techy, and No Experience.
Remember, we can help you build your professional website in case you are not cut out for learning how to build your website. Simply Click here to get started
We shall look at the course from the following heading.
• Choosing a Domain Name
• How to Choose the best web hosting for your website
• Installing WordPress
• Installing a theme to change your site’s design
• Creating pages in WordPress
• Installing plugins for extra features
• Setting up your blog page
You may want to know how much it will cost you to set up your wordpress website, the cost will depend on three major things namely: Domain name, hosting and theme. The first two are compulsory but the third depends on the type of website you are building as you can use free themes/templates to build your website but for a more professional looking website, you may want to get a paid theme.
Fortunately you can get a domain and hosting on qservers for below N20,000 or $44 as at when this article is being written and that is for a starter package and of course that is also for one year as this must be renewed yearly.
There are other local host companies but Qservers is one of the best when the emphasis is on local company.
Get your domain and hosting from qservers
It is important to note that building a Worpress website requires two most important items as stated above and that is:
1. Domain name – your unique address online e.g. google.com
2. Hosting – where your files/contents will be stored.
We recommend you start small and then add more features to your website as your business grows. This way you will save money and minimize potential losses and also avoid overspending.
In this guide, you will learn how to build a website for less than N20,000
It is important to note at this point that WordPress is free and you are not paying a dime for the software, you simply download and install but you will learn how and where to install it.
WordPress is the most popular website builder powering over 30% of websites on the internet and it comes with thousands of added features via plugins which you can use to achieve just about anything.
Let’s get started.
STEP 1: GETTING YOUR DOMAIN AND HOSTING
As I mentioned earlier, you need to buy your domain and hosting to get started and you can do that here through Qservers. One of the reason I recommend local host is to save you the trouble of payment challenges which can be associated with trying to carry out international payment for the first time.
You also have the advantage of local support which although is available with foreign hosts, there are few challenges such as time difference, language etc but of course as you get sophisticated in it, you can decide to use any host from anywhere. But in case you don’t have any challenges with foreign payment, you can go with Namecheap.
Note: At Digital Skills Academy, we believe in transparency. If you purchase hosting using our referral link from Qservers, then we will get a small commission at no additional cost to you. In fact, you will get discount on hosting + a free domain name (.com.ng & .org.ng).
We would get this commission for recommending any WordPress hosting company, but we only recommend products that we personally use and believe will add value to our readers.
Let’s go ahead and purchase domain name and hosting.
First, you’ll need to go to the Qservers website in a new browser window and click on Domain – register domain names.
This will bring you to a new page where you have to enter your preferred domain to check availability, then you will proceed to choosing the number of year you want to register and also add a hosting plan.
There after, you will be brought to the page where you enter your details; please ensure you enter valid details as any attempt to carry out any fraudulent activities will lead to the suspension of your website without notice.
Ideally you should stick to a .com domain name. Make sure that it is related to your business, easy to pronounce and spell, and easy to remember.
Need help choosing a domain name for your website? See these tips and tools on how to choose the best domain name.
After choosing your domain name, click on the next button to continue.
Now you’ll be asked to provide your account information such as name, address, email, etc.
On this screen, you will also see optional extras that you can purchase. We generally don’t recommend purchasing these extras. You can always add them later on, if you decide that you need them.
Next, you will have to transfer the amount on your invoice to Qservers via the accounts displayed on the invoice or you can make direct payment online.
After completing your purchase, you’ll receive an email with details on how to login to your web hosting control panel (cPanel).
This is your hosting dashboard where you manage everything like getting support, setting up emails, etc. Most importantly, this is where you’ll install WordPress.
STEP 2: INSTALL WORDPRESS
You will find tons of icons to do different things on your hosting account dashboard (cPanel). You’ll never need to use 95% of them, so you can safely ignore them.
Scroll down to the softaculous section in cPanel and then click on the WordPress icon.
On the next screen, you will be asked to select the domain name where you want to install WordPress. Choose your domain from the dropdown field. Please leave the wordpress version to the latest version as displayed.
Now you’ll need to enter your website name, admin username, and a password for your website. Don’t worry, you can change them later in WordPress settings if you need to.
You’ll also need to check all the checkboxes on the screen and then click on the ‘Install’ button to continue.
Quick Install will now start installing WordPress on your website. Meanwhile, it will show you some website templates that you can install on your site.
You don’t need to do that right now because we’ll show you how to find and install free WordPress template on your website later in this guide.
Once the installation is over, you’ll see a success message in the top header.
Now you need to click on the ‘Installation Complete’ link, and it will take you to the screen with your WordPress login URL and password.
Congratulations! You have created your first WordPress website.
You can now head over to the WordPress login page. Your login URL will look like this:
http://www.yourdomain.com/wp-admin
You can login to your WordPress site using the admin username and password you entered earlier.
Wasn’t that easy?
Now let’s move on to the next step and choose a design for your website.
STEP 3: SELECT YOUR THEME
The visual appearance of your WordPress site is controlled by a WordPress theme.
WordPress themes are professionally designed templates that you can install on your website to change its appearance.
By default, each WordPress site comes with a basic theme. If you visit your website, then it will look something like this:
This is not very appealing for most users.
But don’t worry, there are thousands of free and paid WordPress themes that you can install on your site.
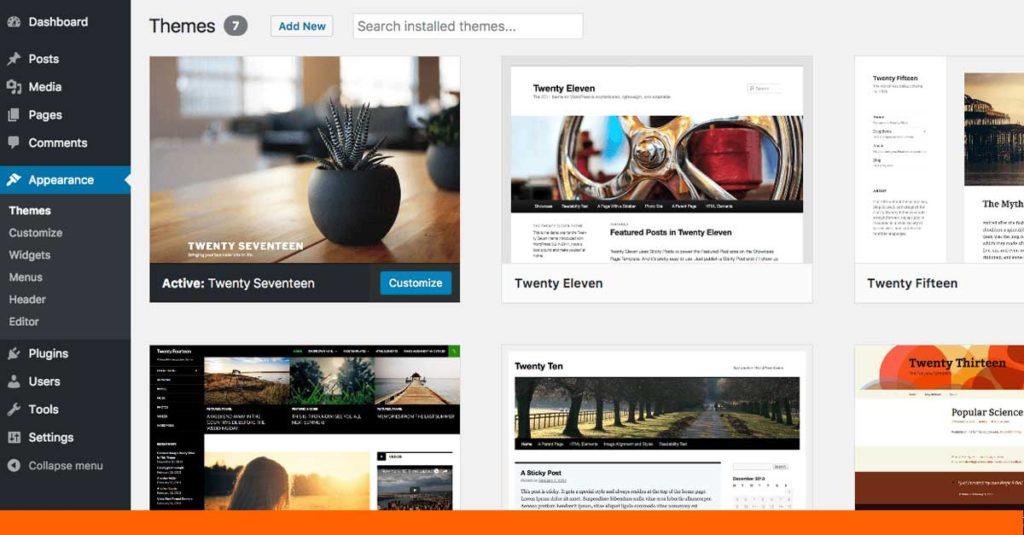
You can change your theme from the WordPress admin dashboard. Visit Appearance » Themes page and then click on the ‘Add New’ button.
On the next screen, you will able to search from over 4,000 free WordPress themes that are available in the official WordPress.org themes directory. You can sort them by popular, latest, featured, as well as other feature filters (i.e industry, layout, etc).
Need help choosing a theme? Check out this list from WPbeginner on list of these awesome free WordPress business themes.
You may also want to take a look at this guide from WPbeginner on how to select the perfect WordPress theme for your website.
For the sake of this guide, we’ll be using OceanWP. It is a popular multi-purpose free WordPress theme with flexible design options for all kind of websites. We will also be using Elementor page builder to make it simpler to build our website.
Should you prefer to use your own free theme, just search for the name under theme and install but ensure that it is compatible with Elementor so you can benefit from this guide.
WordPress will show you the theme in search results. You will need to take your mouse over to the theme and then click on the Install button.
Once you have installed your theme, you can customize it by clicking on the Customize link under the Appearance menu.
This will launch the theme customizer where you will be able to change your theme settings with live preview of your website.
You don’t need to finalize all theme settings right away. You will be able to customize it much better once you have some content on your website.
Let’s see how to add content to your WordPress site.
STEP 4: ADD CONTENTS TO YOUR WEBSITE
WordPress comes with two default content types called posts and pages. Posts are part of a blog and appear in reverse-chronological order (newer items displayed first).
On the other hand, pages are meant to be static “one-off” type content such as your about page, contact page, privacy policy, etc.
By default, WordPress shows your blog posts on the front page of your website. You can change that, and make WordPress show any page as the front-page of your website (we’ll show you how to do that later in this guide).
You can create a separate page for your blog or news section. In fact, you can create a website without any blog section at all.
Having said that, let’s add some content to your website.
You’ll start by adding a few pages to your WordPress site. Don’t worry if you don’t have enough content for these pages at the moment. You can always edit and update them.
Head over to Pages » Add New page in WordPress admin area. This will bring you to the page editor screen, which looks like this:
First you need to provide a title for your page, let’s call this page ‘Home’. Then set your it to Elementor full width and edit with Elementor. When you land on the Elementor dashboard, you can use the drag and drop elements to add text, links, images, videos, audio etc.
After adding content to your page, you can click on the publish button to make it live on your website.
You can repeat the process by adding more pages for different sections of your website. For example, an about page, contact us, and a blog page to display blog posts.
Now let’s add a few blog posts as well.
Head over to Posts » Add New in your WordPress admin area.
You will see a screen much like you saw earlier when adding pages.
You can add a post title and then click edit with Elementor, add your contents and publish just like you did with the pages. You’ll also notice some extra options like post formats, categories and tags. The categories are used to organize your posts on your website.
You can click on the save button to store your post as a draft or click on the publish button to make it visible on your site.
For more detailed instructions on how to utilize all these options on post and page edit screens, please join our 95% practical online web design course where you learn how to design a professional website without coding
STEP 5. CUSTOMIZING AND TWEAKING YOUR WEBSITE
Now that you have created some content on your website, you will be able to customize and put it all in a nice presentable shape on your website.
Let’s start by setting up a static front Page.
Setting up a Static Front Page
You need to visit the Settings » Reading page in your WordPress admin area. Under the ‘Front page displays’ option click on the static front page and then select ‘Pages’ you created earlier for your home and blog pages.
Don’t forget to click on the ‘Save Changes’ button at the bottom of the page to store your changes.
WordPress will now use the page titled ‘Home’ as your site’s front page and ‘Blog’ page to display your blog posts.
Change Site Title and Tagline
During the installation you get to choose your site’s title. WordPress automatically adds a tag line to your site title that says ‘Just another WordPress site’.
You can change both your site’s title and tagline at any time by visiting Settings » General page.
Your site title will be the name of your website like “Digital Skills For Wealth Creation”. The tag line is usually a single line that describes your website. You can also leave the tag line field blank if you want.
Don’t forget to click on the save changes button to store your settings.
Set up Comments Settings
WordPress comes with a built-in comment system allowing your users to leave comments on your posts. This is great for user engagement, but it is targeted by spammers as well.
To deal with this, you’ll need to enable comment moderation on your website.
Visit Settings » Discussions page and scroll down to ‘Before a comment appears’ section. Check the box next to ‘Comment must be manually approved’ option.
Don’t forget to click on the save changes button to store your settings.
Create Navigation Menus
Navigation menus allow your users to browse different pages or sections on your website. WordPress comes with a powerful navigation menu system, and your WordPress theme utilizes this system to display menus.
Let’s add a navigation menu to your website.
First, you need to visit Appearance » Menus page. Enter a name for your navigation menu and click on the create menu button.
WordPress will now create your navigation menu. But it will be empty at the moment.
Next, you need to select the pages you want to display in your menu and then click on add to menu button.
You will notice your selected pages filling the empty area of your navigation menu. You can move them up and down to rearrange their position in the menu.
Now you need to select a display location. These locations are defined by your WordPress theme. Usually, most WordPress themes have a primary menu that appears on top.
Finally, click on the save menu button to store your navigation menu.
You can now visit your website to see the menu in action.
STEP 6: INSTALLING PLUGINS
WordPress Plugins are like apps for your WordPress site. They allow you to add features to your WordPress site. Think contact form, photo galleries, etc.
There are currently more than 49,000 free plugins available for WordPress. There are also paid plugins sold by third-party websites and developers.
With this many plugins, how do you find which plugins to install? We got you covered there as well, join our 95% practical online web design course to learn how to choose the best plugins for your website.
Here is our list of essential plugins that you should install on your site right away. All of them are free.
Features
WPForms Lite – Allows you to add a contact form to your WordPress site.
Envira Gallery Lite – Add beautiful image galleries to your WordPress site
MonsterInsights – Connect your website with Google Analytics and see how visitors find and use your website, so you can keep them coming back.
Website Optimization
Yoast SEO – Improve your WordPress SEO and get more traffic from Google
WP Super Cache – Improves your website speed by serving cached pages
Security
Updraft Plus – Create automatic scheduled backups of your website
Sucuri – Website security audit and malware scanner
Need help installing plugins? Join our 95% practical online web design course where you learn how to build your wordpress website with zero coding. You also have access to expert coaches and a thriving community of learners that are eager to share their knowledge with you.
I hope this guide has been helpful and you can now get started with your wordpress website but in case you still overwhelmed with the information provided, Do well to reach out to us. We shall be glad to help you get started.